Svelte
Introduction
In this case study, I will talk about the difference between React and Svelte, and how you would use Svelte. Svelte is a JavaScript compiler. It’s similar to React, but React uses Virtual DOM. Both provide a similar component-based architecture — that means both enable CDD (component-driven development) bottom-up development, and both enable sharing their components between apps via tools and platforms like Github.
Brief History
Svelte was created by Rich Harris. Svelte is a free and open source front end component framework / language, it is not a monolithic JavaScript library imported by applications. Instead, it compiles HTML templates to specialized code that manipulates the DOM directly.
-
29th November, 2016First stable version of svelte, version 1.0 was released. -
19th April, 2018Version 2.0 is released, major performance improvements like a new API for writing components and TypeScript support. -
25th January, 2019Version 2.4 is released, with new features like context API and improved TypeScript support. -
21th April, 2019Version 3.0 is released written in TypeScript, with a rewritten compiler. -
22th October, 2020Svelte Summit, the first virtual conference dedicated to Svelte took place. -
1th December, 2020SvelteKit was announced in a blog post. -
18th March, 2021SvelteKit entered beta. -
December, 2022SvelteKit was released after two years in development.
Features
Svelte’s template syntax is easy to read and write, and allows you to create dynamic UI elements.
Svelte can be used for server-side rendering, which can improve the performance and accessibility.
Svelte provides efficient bundling and code splitting mechanism, which can help to reduce the size of your application and improve performance.
You can create CSS styles that are scoped to specific components, so they won’t interfere with other parts of your application. This makes it easier to manage your styles and ensure they only apply where you want them to, without causing conflicts or unintended side effects.
Setup
This case study will be utilizing Vite to create a new Svelte project, there are other methods available, such as Degit and then Rollup would be the default, but this case study will not focus on those options. If you would like a full-fledged app framework you can also use SvelteKit, which also utilizes Vite. But since I’m only gonna build a simple front-end only site/app, I will use Svelte (without kit).
You start by navigating to the folder where you want to create the project. Then, open a terminal in the folder and type this command, and hit enter.
npm init vite@latestYou will then be prompted with some options.
- Write the name of the project, or hit enter for the default.
- You will get options for frameworks, choose Svelte.
- You will get options for variants, like JavaScript, TypeScript, or SvelteKit.
I’m going to choose JavaScript for this project, feel free to choose whatever you prefer.
To go go into the project folder, use cd "name of your project".
In the terminal, type code . to open the project in a new VS Code session.
Open your terminal and type these commands:
npm inpm run devYour server will then be live and running. if you want to configure Vite more, you can find the documentation here.
Using svelte
If you are using Visual Studio Code, I would recommend downloading the Svelte extension “Svelte for VS Code”. It will give you formatting, auto completions, and it allows you to use Emmet inside your Svelte components.
This is an example of a fetch using svelte:
<div class="items-container"> <ul> {#await fetchItems(baseUrl + API_KEY + langEnUs)} <p style="font-weight: bold">loading...</p> {:then items} {#each items as item} <li id={item.id}>{item.name}</li> {/each} {:catch err} <p class="error">Something went wrong! -- {err}</p> {/await} </ul> </div>This code will generate the items straight in the HTML using the #await Svelte syntax.
You combine this with a script tag in the Svelte file where you will be setting up the fetch.
<script>  const baseUrl = "your url";  const API_KEY = import.meta.env.YOUR_API_KEY;
  /**   * Fetches the API item.   * @param url contains the targeted API url for the wanted object.   * @returns Should return the response to the svelte #await in the html block.   */  export async function fetchItems(url) {      // fetches the item from the url target.      const res = await fetch(url);
      // Handles bad requests / error responses      if (!res.ok) {        throw new Error(`Bad request ${res.statusText}`);      }
      // setting the response to a variable and returning it      const data = await res.json();      return data.items;  }</script>
The content in the svelte files looks like this.
<script>import Nav from "../lib/comp/Nav.svelte"</script>
HTML HERE// If your in App.svelte you will also have a head and main tag.<svelte:head><title>Homepage | PageName</title></svelte:head>
<main><Nav /></main>
<styles>@import "../css.app.css";</styles>
Context of the script.
-
If you are using typescript you can use the following at the top of your script file:
<script lang="ts"></script> -
If your script should be a module you can use the following in the same way:
<script lang="ts" context="module"></script>. This is the default, so instead you can use<script context></script>when referring to it as a module. -
If your script should be a instance, you just switch out “module” for “instance”.
-
If the script should be loaded asynchronously you can use
async:<script async></script>. This can improve performance by allowing the script to load after the component has finished rendering. -
if you want to debug you can use:
<script debug></script>. This attribute enables or disables debugging mode for the component. This is set to"true"by default.
Svelte Syntax
Svelte application components are defined with .svelte files, which are HTML files extended with templating syntax that is based on JavaScript and is similar to JSX. An important point to mention is that you can create a __layout.svelte component to create a layout that will appear on all pages, such as a header and navigation. You can then create a Header.svelte and a Nav.svelte component, import the Nav to the Header, and then import the Header with everything else, like a logo and hamburger menu, to the __layout.svelte component. By doing this, you will have it on every page.
{@debug} This tag offers an alternative to console.log(), it allows you to console log and debug your code in Svelte.
You can use this in place of console.log().
For example:
<script>  let user = {    firstname: 'Ada',    lastname: 'Lovelace'  };</script>
{@debug user}
<h1>Hello {user.firstname}!</h1>
<style>h1 {color: green;}</style>
This will debug user object and console log its response.
Learn more
@const myVar defines a local constant and is only allowed as a direct child of
{#if}, {:else if}, {:else}, {#each}, {:then}, {:catch}, <Component /> or <svelte:fragment />.
For example:
<script>  export let boxes;</script>
{#each boxes as box}  {@const area = box.width * box.height}  {box.width} * {box.height} = {area}{/each}
Learn more
{#each items as item} {/each} is used to loop through an array or object. You can also include index, a key value for each loop, and {:else}.
For example:
<h1>Shopping list</h1><ul> {#each items as item} <li>{item.name} x {item.qty}</li> {/each}</ul>Learn more
{#await expression}.. {:then item} .. {:catch error} .. {/await} is used to handle promises in Svelte. You can also exclude :then, and if you do not need to render anything when the promise rejects, you can also remove :catch.
For example:
<div class="items-container"> <ul> {#await fetchItems(baseUrl + API_KEY + langEnUs)}<---- Promise is pending -----> <p style="font-weight: bold">loading...</p> {:then items}<---- Promise was fulfilled -----> {#each items as item} <li id={item.id}>{item.name}</li> {/each} {:catch err}<---- Promise was rejected -----> <p class="error">Something went wrong! -- {err}</p> {/await} </ul> </div>Learn more.
Strengths
-
The build time is much faster when compared to react or even other frameworks.
-
The bundle size is smaller and tiny when gzipped.
-
Binding classes and variables are relatively easy, and custom logic is not needed when binding classes.
-
Scoping CSS withing the component itself allows flexible styling.
-
It is easier to understand and get started with compared to other frameworks.
Weaknesses
-
Svelte does not automatically listen for updates to references and array mutations, so developers need to actively watch for these and ensure that arrays are reassigned in order to upodate the UI.
-
The syntax for handling DOM events can also be annoying, as it requires special syntax such as
on:clickrather than more straight forward likeonClick. -
Svelte is a new and relatively young framework with minimal community support, thereby does not have support for a wide range of plugins and integrations that might be required by large-scale production applications. In this regard, React is the powerful contender here.
Comparison
Svelte vs react
Both Svelte and React.js are component-based JavaScript frameworks used for building web applications. Here are some of the difference between them two:
Approach to building UI components Svelte compiles the application during build time, resulting in small and fast applications. On the other hand, React uses a virtual DOM, which is updated during runtime, resulting in slower performance than Svelte for large applications.
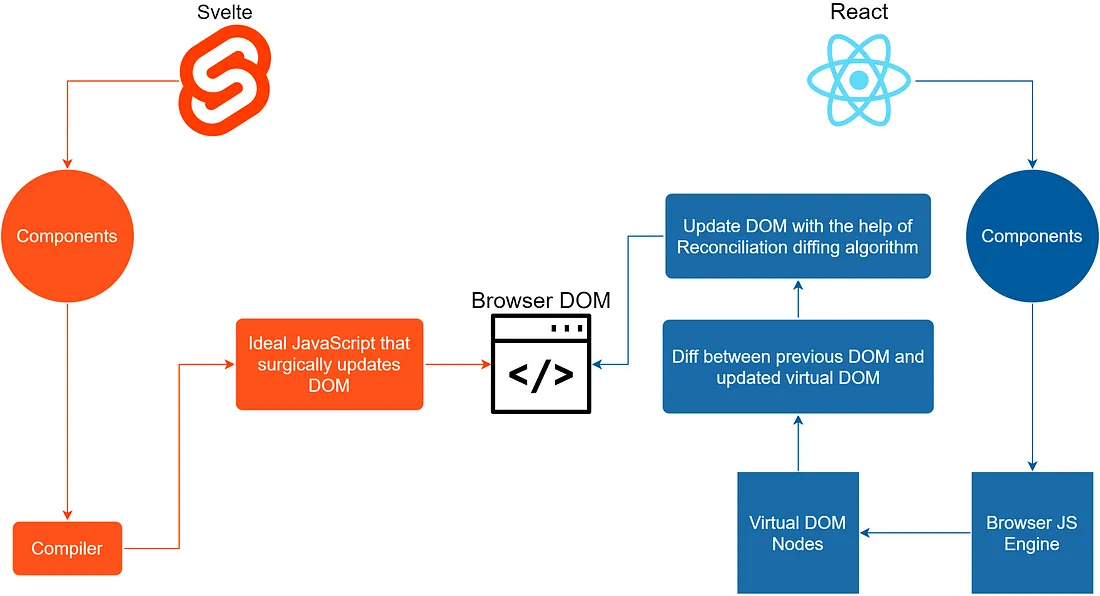
According to the Svelte Documentation
Instead of using techniques like virtual DOM diffing, Svelte writes code that surgically updates the DOM when the state of your app changes.
Svelte is a radical new approach to building user interfaces. Whereas traditional frameworks like React and Vue do the bulk of their work in the browser, Svelte shifts that work into a compile step that happens when you build your app.
Learning curve Svelte is easier to learn and use because it requires less setup, configuration, and boilerplate code than React. Svelte’s templating syntax is similar to HTML and JavaScript, whereas React uses JSX, which requires a bit more knowledge.
Bundle size* Svelte generates smaller bundle sizes than React, resulting in faster load times and better performance.
Community support React has a larger and more established community, resulting in a wide range of plugins, integrations, and libraries. Svelte is a newer framework and has less support in terms of libraries, plugins, and integrations.
Re-rendering Svelte has a unique approach to reactivity that results in automatic updates of the UI without the need for virtual DOM reconciliation. In contrast, React relies heavily on the virtual DOM and requires updates to be reconciled.
Summary Svelte is a compiler-based framework that is easier to learn and generates smaller bundle sizes for web applications. React is a more established framework with a larger community, providing a wide range of plugins, integrations, and libraries for building large-scale applications.
Summary
Svelte is a free and open-source front-end component framework that compiles HTML templates to specialized code that directly manipulates the Document Object Model (DOM), which was created by rich harris in 2016.
Svelte is a framework that’s similar to React, Svelte uses a compiler and provide efficient bundling and code splitting, wich reduces the size of the application and improves the performance. Wich also means your app will run better and take up less space. If you want to learn how to use Svelte and start using it in your own applications, This case study covers the basics.
Since release, svelte has become the most popular framework available as shown in the State of javascript survey.
Credits
Tony Erlandsen - Sigvel
References
-
https://blog.bitsrc.io/react-vs-sveltejs-the-war-between-virtual-and-real-dom-59cbebbab9e9
-
https://www.eternaldev.com/blog/build-and-deploy-apps-with-svelte-and-vite/