Supabase
Author: Christian BekkelundA case study of Supabase
Introduction
Supabase is an open-source alternative to Google’s Firebase that provides similar tools for developing and deploying web and mobile apps. 1
Supabase provides services for user authentication, app analytics, real-time database and hosting, among other services as well. 1
Supabase Features
Real-Time Database
Supabase provides a real-time database built on top of PostgreSQL, allowing for responsive access and handling of data. 1
Authentication
Supabase offers different ways of handling authentication. It can be used as a standalone service, or deeply integrated with other Supabase services. 2
Authentication can be implemented in several ways:
- Password-based method such as email or phone and password
- Passwordless methods such as sending a magiclink or one-time password (OTP)
- OAuth social providers:
- Apple
- Discord
- Github
- and many more2
Authorization
Supabase uses Row Level Security (RLS) for handling authorization. You can customize your own PostgreSQL RLS policies.2
Storage
Supabase has built-in storage support, allowing for storing and managing data in a web or mobile application. Supabase Storage can store and serve images, videos, documents and other file types.3
Edge Functions
Supabase edge functions are server-side functions written in Typescript, distributed globally in order to provide close proximity to the users. Edge functions allow for third-party integration with other services.4
Pricing
Supabase’s pricing model is divided into four tiers.
Free Tier
$0.00 / month
Featues:
- Unlimited API requests
- 50, 000 monthly active users
- 500 MB database space
- 5 GB bandwith
- 1 GB file storage
- Community support
Pro Tier
$25.00 / month
Features:
- 100, 000 monthly active users
- 8 GB database space
- 250 GB bandwith
- 100 GB file storage
- Email support
- Daily backups stored for 7 days
- 7-day log retention
Team Tier
$599.00 / month
Features include every feature from the Pro tier, plus:
- SOC2
- HIPAA available as paid add-on
- Read only and Billing member roles
- SSO for Supabase Dashboard
- Priority email support and SLAs
- Daily backups stored for 14 days
- 28-day log retention
Enterprise Tier
In addition to the three fixed priced tiers, Supabase also offers an option for large-scale applications. Pricing depends on specific demands.
Platform Integration
Supabase works well in combination with popular frontend frameworks, such as React, NextJS, Vue and Svelte. Additionally, it supports Kotlin and Swift making it a viable choice for mobile development.
Integrating Supabase with React
In this section, I will walk us through a basic setup of Supabase with React and Vite. We will cover:
- Creating new Supabase project
- Creating a table with columns
- Setting up a Supabase client
- Creating a simple form in React and insert data into our Supabase table
In order to get started with Supabase, we must first sign up to Supabase, and create a new Supabase project.
After Supabase is finished setting up your project, go to Settings and API Settings. Here you will find your “Project URL” and “Project Api Keys”; make a note of these, as we will be needing them when creating our Supabase client.
Next, we need to set up our React project. In this instance, we will be using Vite.
npm create vite@latest my-app -- --template reactAdditionally, we will need to install the Supabase Client library in order to get access to Supabase’s methods for working with the backend.
npm install @supabase/supabase-jsOpen the project in a text editor,
create a folder named backend and create a file named client.js inside of it.
In the client.js file we will create our Supabase client. The client connects our frontend to the backend, and exposes all the methods we will need in order to use Supabase.
import { createClient } from "@supabase/supabase-js"
const supabase = CreateClient(projectURL, apiKey)
export default supabase
The CreateClient function takes in to arguments: the Supabase Project URL and the Project API key. Make sure to use the public key.
We have now created a Supabase client with our project URL and api key; this connects our frontend to the Supabase backend, and gives us access to the methods we need in order to make requests to our backend.
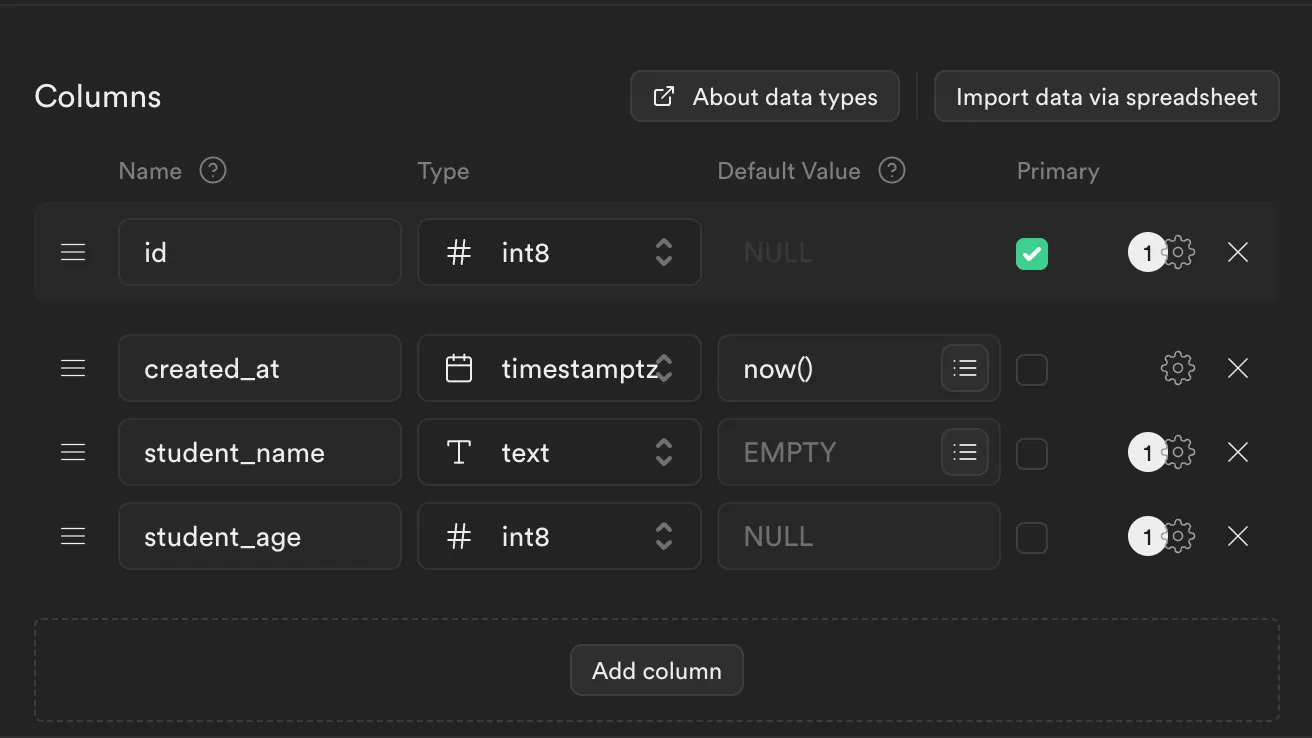
Let’s go back to our Supabase project, and create a database table. Click on “Table Editor” on the sidebar on the left, and click “New Table”. From here you can set the name of the table, enable Row Level Security (for this case, we will disable RLS), and define column names and data types.
Let’s create a table named “students” and add the following columns:
With the table all set, we are ready to interact with our database. Move back into your React project.
Let’s create a simple form with all input fields we need to populate our “students” table.
<form onSubmit={handleSubmit}> <div> <label htmlFor="name">Student Name</label> <input type="text" name="name" id="name" /> </div> <div> <label htmlFor="age">Student Age</label> <input type="number" name="age" id="age" /> </div> <button type="submit">Add Student</button></form>We will attach the following handler function to the submit event on the form:
const handleSubmit = async e => { e.preventDefault() const formData = new FormData(e.target) const name = formData.get("name") const age = formData.get("age") try { const { error } = await supabase.from("students").insert({ student_name: name, student_age: age }) if (error) throw { error, message: "Failed to post to database" } } catch (error) { console.log(error.message) }}When submitting the form, we call two methods our supabase client: from and ìnsert.
With from we choose which table we want to use, and ìnsert is comparable to a POST method in HTTP, and we pass it an object with the column names as the argument.
If everything went as expected, you can now check your Supabase table, and see that a new student has been added.